cancel
Showing results for 
Show  only  | Search instead for 
Did you mean: 
Check out the JMP® Marketplace featured Capability Explorer add-in
Choose Language Hide Translation Bar
LisaG
Staff
Hover Labels: Codeless customizations

As described in the Git documentation, the term “porcelain” refers to a user interface that is designed to be easy to learn and navigate. This post demonstrates how the high-level commands that implement the porcelain part of the Hover Label extensions feature can support drilling and further exploration of visualizations with just a few clicks (no JSL knowledge required!). The following examples use graphlet presets, Paste Graphlet and platforms with built-in graphlets.

Graphlet presets

With the addition of hover labels’ extended features, such as graphlets, you can drill down into visualizations for further analysis. To add a graphlet in a Hover Label, select the predefined graphlet preset, accessible via the right-click menu under Hover Label. These presets have dynamic graph role assignments, which they derive from the variables used within the graph. Presets are also preconfigured to be recursive to support drilling down.

LisaG_0-1611605890904.png

From the list, there are nine different preset options to choose from to help answer the question of what is behind an aggregated visual element. The Marker preset shows the exact values, whereas the Histogram, Box Plot, and Heat Map presets show a distribution of values. You can also break down and look at a graph with another category with the Bar, Pie, Treemap and Line presets. The Tabulate preset makes it possible to examine a table’s raw data.

For preset graphlets that use categorical columns, select the Next in Hierarchy column property, found in the data table, to specify which columns will be used in the next level of a drill-down.

LisaG_1-1611605890915.png

In the following animated gif, the Distribution graphlet preset is used to look at the distribution of bill lengths per species in the Penguins.jmp data table. After applying the preset and hovering over the bars, the distribution graphlet appears in the hover label. In the top-right corner of the hover label, there is a pin option that keeps the hover label present on the graph. Notice below that there are two pinned graphlet labels side by side, allowing for an easy comparison of the distribution of the data all in one chart.

preset.gif

To take it a step further, click on the graphlet thumbnail, as shown in the animated gif below, to launch the graphlet in its own Graph Builder window and interact with the data visualization behind it. Also, in the launched graphlet window, there is a Local Data Filter (LDF) that facilitates filtering from the base graph; this LDF can be easily updated. And remember, the presets are recursive, so after applying the histogram graphlet preset, you can drill down multiple layers of data simply by hovering over an element in the launched graphlet window.

recursive.gif

Paste Graphlet

To construct a graphlet from scratch instead of using a predefined graphlet preset, Paste Graphlet makes it easy to do in three simple steps:

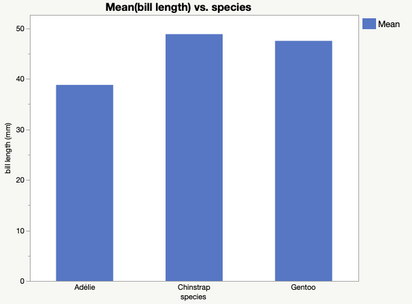
  1. Build both the base graph (left) and a graph that to use as a graphlet (right). NOTE: This is not exclusive to Graph Builder; any platform that supports an LDF can be used.
                          

     LisaG_3-1611673658859.png         LisaG_2-1611673608446.png
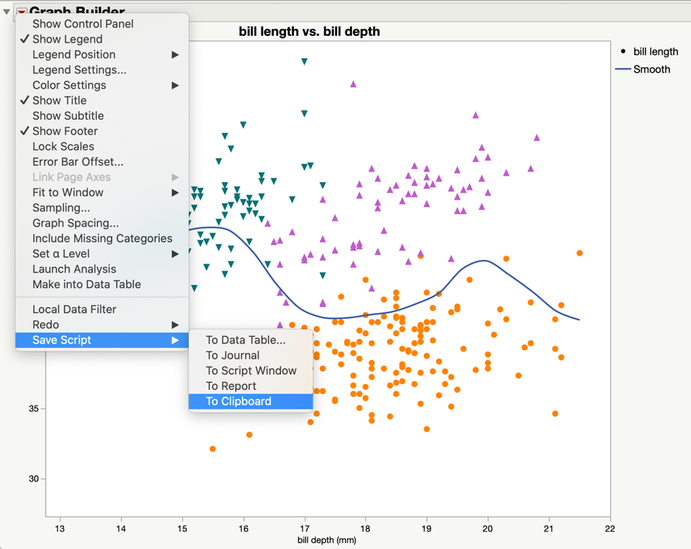
  2. Using the red triangle menu, save the script of the graph to the clipboard.
LisaG_2-1611605890943.png


  1. Return to the base graph and right-click Hover Label to access the Paste Graphlet option to complete the operation for a graph with a custom-built graphlet.

   LisaG_3-1611605890952.png          LisaG_4-1611605890957.png

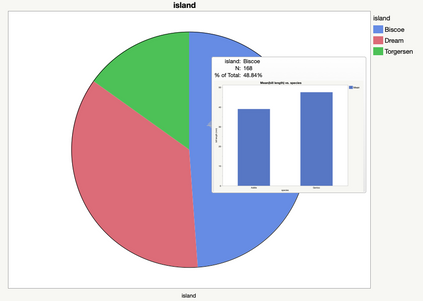
Unlike graphlet presets, Paste Graphlet will have static role assignments and will not be recursive, since its graphlets need to be drilled down one level at a time. However, by nesting Paste Graphlet operations from the bottom layer up to the top/base graph layer, you can create multiple, custom drill-downs. Continuing with this example, repeat the three steps, save the above bar graph with a pasted scatterplot graphlet to the clipboard and paste it on a new graph. By making a pie chart and pasting the script from the clipboard, there are three layers to the graph:
LisaG_5-1611605890962.png         LisaG_6-1611605890966.png

Built-in graphlets

There are several JMP platforms that have preintegrated graphlets: Function Data Explorer, Process Screening, Multivariate Control Chart, Outlier Analysis of Principal Components, and Process Capabilities. Using Outlier Analysis of Principal Components, below is an example of a graphlet that is automatically generated when hovering over elements:

LisaG_7-1611605890988.png

These examples are just a brief overview of the porcelain features that enable you to do some quick customizations with hover label graphlets in a matter of clicks.

Be sure to check out the next blog post in this series that reviews the plumbing – the low-level interface that allows you to explore rich customization options, plus the full range of hover label extensions.

Last Modified: Feb 8, 2021 10:51 AM
Comments
David_Burnham
Super User (Alumni)

I've not figured out what should happen when using these presets.  If for example, I have a scatterplot and set the hover label to be a histogram, I get a histogram of that data point:


David_Burnham_1-1628864379208.png


LisaG
Staff

Hi David,

Yes, you are correct that if you set a histogram graphlet preset on a scatterplot, you will only see a histogram of that single observation which may not be helpful in your exploration. However, with an aggregated visualization like this bar below, the histogram graphlet preset will show you a distribution of the values in each bar:


LisaG_0-1628867737888.png


David_Burnham
Super User (Alumni)

OK, that makes sense.  Thanks.

EnioC
Level I

Lisa,


Is there a keyboard shortcut to pin the hover label? Sometimes when I move my cursor over the label it disappears.


Thx

LisaG
Staff

Hi @EnioC, there is not currently a keyboard shortcut to pin the hover label. If you are having difficulty clicking the pin before the hover label disappears, you could try right-clicking anywhere on the hover label and use the pin option there. 

EnioC
Level I

Thank you Lisa for your prompt reply.


Issue I have when I plot dense wafer data, The hover label disappear even with small mouse movement. Hovere label is not there for a right-click. Perhaps I need a better mouse.


Thank you again


Enio

lala
Level VIII

This content is novel.

I would like to know whether this figure can be made separately by JSL.

I look at the Penguins_Examples file, which is made by the main component module.

Thanks!

2022-07-11_15-06-46.png

LisaG
Staff

Hi @lala, a more straightforward way to create this example is by using the MDMCC platform like in the script below. I hope that helps!

Model Driven Multivariate Control Chart(
	Process( :bill length, :bill depth, :flipper length, :body mass ),
	Set Component( 2 ),
	SendToReport(
		Dispatch(
			{"Monitor the Process", "T² for 2 Principal Components"},
			"Monitor the process",
			FrameBox,
			{Reference Line Order( 2 ), Grid Line Order( 1 )}
		)
	)
);
SampleTapir814
Level II

I have a column in a take with URL links to images.  I would like to hover over a point and see the image associated with that row.  And also click the point and go to the URL.   

SampleTapir814
Level II

I have a column in a table with URL links to images.  I would like to hover over a point and see the image associated with that row.  And also click the point and go to the URL.  

jthi
Super User

@SampleTapir814 I would suggest posting a new post to general JMP Community discussion about this. Also include example data if possible and image of the possible point you wish to be clicked to go to the URL.

LisaG
Staff

Hi @SampleTapir814, here's a snippet of code to add to your graph that will populate images in your hover labels based on the url links & also make the images clickable. Here I named the column url_link so you may update that based on your own column name. Please also check out some of the other examples in the Scripting Index for setting graphlets! 

Set Graphlet(
	Picture( 
		Picture Box( Open( :url_link[local:_firstRow] ) ) 
	),
	Click(
		Web( :url_link[local:_firstRow] )
	)
)


SampleTapir814
Level II

Thank you LisaG.  I think the problem I am now having that I have a column of URL text string that are not being recognized as URL's.  How in jsl script can I make it so they are recognized as URLs.

SampleTapir814
Level II

Thank you @LisaG .  I think the problem I am now having that I have a column of URL text string that are not being recognized as URL's.  How in jsl script can I make it so they are recognized as URLs.

LisaG
Staff

@SampleTapir814, I believe the url link needs to directly lead to an image. For example, your url link format should look something like https://website.com/picture.jpg . If it is not in this format, the image may not populate correctly in the hover label. 


A way I like to double check that my url links work properly is to apply an Event Handler property to my URL link column. This way I can directly click on the link from my table to confirm it opens correctly in a browser. 

LisaG_0-1667856694822.png


SampleTapir814
Level II

In jsl, I query an Oracle table to with the URLs.  How can I apply an Event Handler property to my URL link column in jsl? 

LisaG
Staff

@SampleTapir814, here is how you can set an Event Handler with jsl: 

// Change column property: url_link
Data Table( "Table" ):url_link << Set Property(
	"Event Handler",
	Event Handler(
		Click(JSL Quote(Function( {thisTable, thisColumn, iRow}, // 3 parameters
{ /* list of local variables, if needed */ },
// begin your code here
// this example is for URLs like https://www.jmp.com .
// You could build the URL from other columns and show
// a simpler ID in this column. You could also run a JMP
// platform instead of using the web() function.
Web( Char( thisTable:thisColumn[ iRow ] ) ); // open a web page
)))));// end your code here