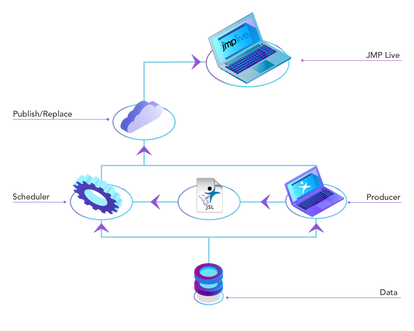
 JMP Live workflow: from data input to automated report publication.As a JMP Live admin, you are going to be asked by the producers in your organization how to publish reports automatically on a routine schedule without having to manually click “Run.” That's easy!
Trick #2: Automate Those Reports
Tell them all they need to do is use JSL (JMP Scripting Language) in conjunction with Windows Task Scheduler.
Doing so allows users to automatically publish reports that are updated with fresh sets of data without any manual intervention. Armed with JSL’s HTTP Request function, users can easily create the scripting needed to pull in fresh data from online databases via API requests (more information found in this blog post). HTTP Request can even be used with online databases (like Salesforce) that require OAuth 2.0 token authentication to access the data contained within.
Once the data is pulled into JMP, the user can easily manipulate the data table with the various object calls available in JSL. After using this data table to generate a Graph Builder report, save the script with the Save Script option found in the red triangle menu of the Graph Builder interface. The combination of the HTTP Requests (described above), data manipulation scripts, and Graph Builder scripts is all you need to successfully generate the up-to-date report you want – with just the click of a button.
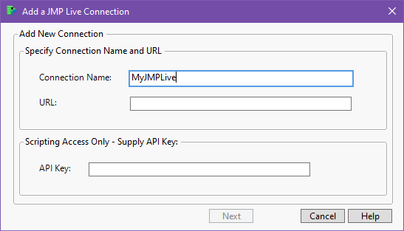
Once you have the scripts necessary to generate the up-to-date report, the next step is scripting the first publish to JMP Live. However, before the first publish can occur, you must create a JMP Live Connection object that will serve as the reference to your JMP Live site. This object is initialized and maintained interactively in the (File -> Publish -> Manage Connections...) menu. If you are creating the JMP Live Connection for the first time, select "Add New..." and input the JMP Live URL in the "URL: " field and the API Key in the "API Key..." field. The API Key is obtained by going to your Profile in JMP Live and selecting "Edit", which will bring up a window with a "Generate API Key" button. Clicking this button will bring up another window where your API Key is displayed. Finally, the input for the "Connection Name: " field can be set as anything that you desire, and will serve as the key used to reference a JMP Live Connection in JSL and in the (File -> Publish -> Publish to JMP Live...) interactive menu.

Now that the JMP Live Connection has been successfully created, you can begin scripting the first publish to JMP Live. First, start a connection to JMP Live using stored connection information by using the New JMP Live() function and referencing the "Connection Name" key specified earlier. After adding the reports you wish to publish to a New Web Report() object, use the Publish() function to successfully script the first publish of the web report. The Publish() function publishes a webreport to the JMP Live site specified in the JMP Live Connection object. Below is an sample script on how to start a connection to JMP Live and then publish for the first time:
liveconnection = New JMP Live( Connection( "MyJMPLive" ) );
webreport = New Web Report();
webreport << Add Report( r1, Title(“Dashboard of Air Quality”) );

jmpliveresult = liveconnection << Publish( webreport, Public( 1 ), Title( "My Report" ) );
After the report has been successfully published to JMP Live for the first time, there are two options for successfully updating a single report in JMP Live. The first option is to replace an existing JMP Live report with another single report using the Replace() function. Below is a sample script on how to replace a report:
liveconnection = New JMP Live( Connection( "MyJMPLive" ) );
webreport = New Web Report();
webreport << Add Report( r1, Title(“Dashboard of Air Quality”) );

jmpliveresult = liveconnection << Replace( webreport, ID( "Report Identifier" ) );
The second option is to use the Update Data() function to update the data table for a report without replacing the report itself. The Update Data() function allows for changing of the file name if desired. Below is a sample script on how to update the data table for a report:
liveconnection = New JMP Live( Connection( "MyJMPLive" ) );
dt = Data Table ( "Example Table" );

jmpliveresult = liveconnection << Update Data( "Report Identifier", Data( dt, "Example Table" ) );
And now your script is complete! Use Windows Task Scheduler to set the schedule of when the report is run by following these steps to set up the task correctly:
- Once Task Scheduler is open, select “Task Scheduler Library” in the menu on the left.
- Select “Create Task…” in the menu on the right, which will open a new window where the task is created.
- Make sure to name the task and then select “Run whether user is logged in or not.”
- Go to the Actions menu and select “New,” which will open a new window called “New Action.”
- Keep Action as “Start a program” and select “Browse.”
- Find the location of the jmp.exe file for JMP 15 and select “Open” for that file.
- In the New Action window, copy and paste the file location of the script you wish to automate to the “Add arguments (optional)” box. Make sure the file location is contained within quotation marks.
- Select “OK” to save your changes.
- Select “Triggers” in the Create Task window.
- Select “New,” which will open a new window called New Trigger.
- Use this menu to set the schedule for the script. Make sure that Enabled is checked before selecting “OK” to save your changes.
- Select “OK” to save the task; enter your system username and password.
There are several important items to keep in mind while using Task Scheduler:
- JMP 15 sessions will remain hanging even if the script is executed without any errors. It is extremely important to include a Quit("No Save") line at the end of your script to prevent this from occurring.
- JMP 15 sessions will remain hanging if the script is executed and an error occurs. The best way to prevent this is to modify your script to be Try ( your script, Quit("No Save") ). Doing so will quit the JMP 15 session and prevent it from hanging if an error occurs.
- When your system password changes, you must go to each task and re-enter your new system password, otherwise it will not run. After double-clicking the task and selecting “OK,” you will then be prompted to enter your system username and password.
 A successfully scheduled task with some of the required settings visible.
Editor's note: Have you read the other installments in our JMP Live admin tricks series?
You must be a registered user to add a comment. If you've already registered, sign in. Otherwise, register and sign in.