Administrating Users
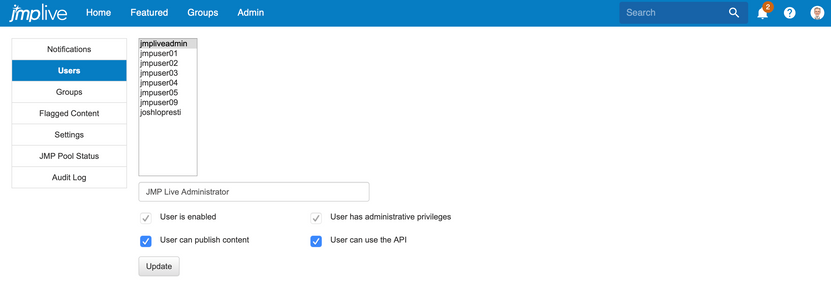
Users and their respective permissions can be managed in the Users section under the Admin tab. Once you open the Users section, all of the users present within the server are listed by their username/email. There are five different edit options available to a JMP Live admin:
- Changing their display name.
- Checking and unchecking “User is enabled”:
- This checkbox determines whether the user has access to the reports in JMP Live
- Checking and unchecking “User can publish content.”
- Checking and unchecking “User has administrative privileges.”
- Checking and unchecking "User can use the API."
 Users section of the Admin tab, where admins have a handful of options available to them to determine user permissions.
Trick #3: Generate a table of JMP Live user data
A full table of data on users can be generated using a REST API through JSL’s HTTP Request() function.
The attached script (JMP Live Login.jsl) is used to log in the admin. This process requires four pieces of information:
- JMP Live URL - line 8
- API Key - line 9
- Username - line 10
- Password - line 11
Once logged in, the code below can then be used to generate a table containing data on the users.
// --------------------------------------------------
// List all users and generate a data table with users
// --------------------------------------------------
request << reset( Url( webJMPUrl || "/api/v2/users" ), Method( "GET" ), Insecure );
data = request << Send;
dt = JSON To Data Table( data );
Administrating User Reports
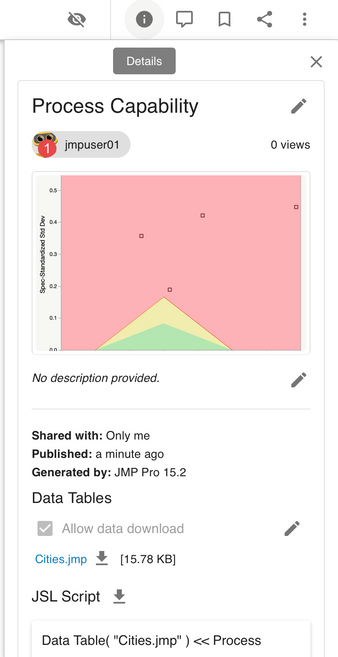
 Private report where the edit options are indicated by the "Pencil" symbol.An important aspect of being a JMP Live admin is knowing how to manage your users’ reports. As an admin, you have access to all reports that are published publicly to the JMP Live server (e.g., any published report where the “shared to:” option selected is “everyone”). You also have access to all privately published reports (e.g., any published report where the “shared to:” option selected is “only me”) and all reports that are published to groups of which you are a member. You do not have immediate access to reports published within groups to which you are not a member, but these reports can be accessed by going to the Groups section under the Admin tab.
Each report can be managed by selecting the “three dots” button, which allows you four options:
- Edit, so that you can edit the report.
- Delete, so that you can delete the report.
- Flag as Inappropriate, so that you can flag the report for future review in the Flagged Content section found in the Admin tab.
- Stop Sharing with Groups, so that you can select the report to no longer be shared to a specific group.
Selecting “Edit” allows you to edit the user report with the following options:
- Change the name of the report.
- Change the thumbnail of the report.
- Change the description of the report.
- Allow downloading of the data behind the report.
- Change how the report is shared:
- “Only Me” makes the report private to the user who published it.
- “Everyone” makes the report public to the JMP Live server.
- “Groups” allows you to select the groups where the report will be included. A report can be included in multiple groups, with a maximum of 8 groups allowed.
Editor's note: Have you read the other installments in our JMP Live admin tricks series?
You must be a registered user to add a comment. If you've already registered, sign in. Otherwise, register and sign in.