JMP Blog
A blog for anyone curious about data visualization, design of experiments, statistics, predictive modeling, and more- JMP User Community
- :
- Blogs
- :
- JMP Blog
- :
- Making a directory tree viewer in JMP
- Subscribe to RSS Feed
- Mark as New
- Mark as Read
- Bookmark
- Subscribe
- Printer Friendly Page
- Report Inappropriate Content
Introduction
With a little scripting, it's easy to create all sorts of fun utilities and tools to save time with JMP. Sometimes, these tools help you save time in the analysis part of your work, and sometimes, like this example, they help you save time in the more mundane aspects of work. I recently saw this excellent blog by @Craige_Hales and wondered if JMP could be used to make a utility to show directory tree maps, which are a handy way to view which files are taking up space on a hard drive. It turns out JMP can easily do this. So, while there are plenty of freeware utilities that make directory treemaps, doing it for yourself in JMP can be a fun way to learn scripting. Read on to find out how easy it actually is.
Don't waste your time writing code that JMP can write for you
The first thing to keep in mind when doing scripting in JMP is that it is already scripting for nearly everything in the background. As a result, all you need to do is string together what JMP already provides. Occasionally, you might still need to dig a bit deeper. The utility shown below mixes a little bit of actual coding along with what JMP already does.
Step 1: Do it in JMP
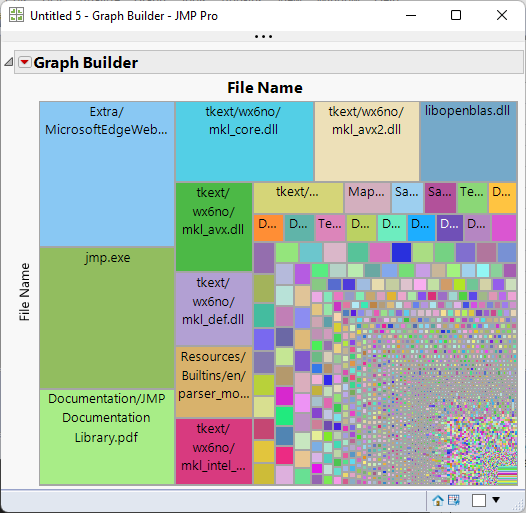
For this utility, we need a list of files in a user-selected folder (and any files in any subfolders), as well as the size of each file. Once we have that, we need a treemap of each file by size. JMP has tools for both of these needs, via the Multiple File Import and Graph Builder. Here are the steps to make the first proof of concept without any scripting:
1. Getting the data: Select File...Import Multiple Files. I selected the JMP installation directory, which is something everyone should have. After selecting the Include subfolders button, right-click on the table in the middle and select Make into Data Table.
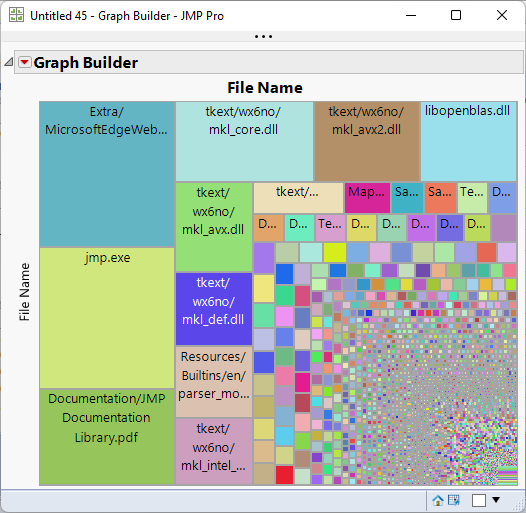
2. Making the treemap: Launch Graph Builder, then drag File Name to the Y zone and File Size to the Size zone. Select Treemap from the top; next select Squarify from the Layout dropdown in the control panel.
Step 2: Put the pieces together with scripting
Now that we've made the utility without scripting, we just need to put it together as a script. Here's a little outline of what we need, along with how to go about it:
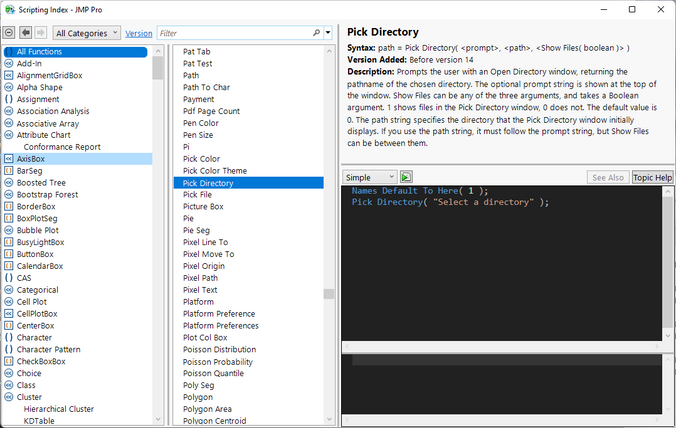
- Choose folder: Easy. Copy/paste from scripting index for the Pick Directory() command.
- Get table from Multiple File Import: Might be tricky. We need to tell a platform to export part of itself as a data table.
- Make treemap: Easy. Copy/paste from the graph already made.
Instead of just the two steps required previously when using the GUI, there now are three. However, the new step of choosing a folder isn't difficult. Looking at the Scripting Index entry for the Pick Directory command, we can copy and paste what's there into our own script, modifying the script just a bit to store the directory chosen in the variable called folder.
Here's our script so far, with Step 1 completed (and a comment at the beginning to remind us in three years what this was all about):
//script to make treemap of directory structure
Names Default To Here( 1 );
folder = Pick Directory( "Select a directory" );
The next step is a bit involved, but it's straightforward after learning how to script the report layer (a blatant plug for the excellent and free JMP Scripting Course). Essentially, what I need to do is export the table from the middle of the Mutiple File Import window via scripting, instead of exporting it via right-clicking. To do this, I launch the Import Multiple Files platform via the GUI, use the GUI to get the script for the platform, then use the GUI to find out what JMP calls the table in the middle. This will take three steps:
- Get script for Import Multiple Files: Select File...Import Multiple Files, choose a folder, select Include subfolders, then push the Save Script to Script window button. We now have a script that we can copy/paste onto the end of our main script.
- Modify the Import Multiple Files script: Replace the quoted folder near the top with the word folder and change the Import Data section from the end to Create Window, since we don't want to actually import any data. Add tempwin = to the beginning of this portion of the script, so that we can refer to this window later. After these tweaks, the script for this section looks like this:
-
tempwin = Multiple File Import(
	<<Set Folder( folder ),
	<<Set Show Hidden( 0 ),
	<<Set Subfolders( 1 ),
	<<Set Name Filter( "*;" ),
	<<Set Name Enable( 0 ),
	<<Set Size Filter( {6, 123039040} ),
	<<Set Size Enable( 0 ),
	<<Set Date Filter( {3349776960, 3766384574.714} ),
	<<Set Date Enable( 0 ),
	<<Set Add File Name Column( 0 ),
	<<Set Add File Size Column( 0 ),
	<<Set Add File Date Column( 0 ),
	<<Set Import Mode( "CSVData" ),
	<<Set Charset( "Best Guess" ),
	<<Set Stack Mode( "Stack Similar" ),
	<<Set CSV Has Headers( 1 ),
	<<Set CSV Allow Numeric( 1 ),
	<<Set CSV First Header Line( 1 ),
	<<Set CSV Number Of Header Lines( 1 ),
	<<Set CSV First Data Line( 2 ),
	<<Set CSV EOF Comma( 1 ),
	<<Set CSV EOF Tab( 0 ),
	<<Set CSV EOF Space( 0 ),
	<<Set CSV EOF Spaces( 0 ),
	<<Set CSV EOF Other( "" ),
	<<Set CSV EOL CRLF( 1 ),
	<<Set CSV EOL CR( 1 ),
	<<Set CSV EOL LF( 1 ),
	<<Set CSV EOL Semicolon( 0 ),
	<<Set CSV EOL Other( "" ),
	<<Set CSV Quote( "\!"" ),
	<<Set CSV Escape( "" ),
	<<Set XML Method( "guess" ),
	<<Set XML Guess( "huge" ),
	<<Set XML Settings( XML Settings() ),
	<<Set JSON Method( "guess" ),
	<<Set JSON Guess( "huge" ),
	<<Set JSON Settings( JSON Settings() ),
	<<Set PDF Method( "guess" ),
	<<Set PDF Settings( PDF All Tables( Combine( All ) ) ),
	<<Set Import Callback( Empty() )
) << create window;
-
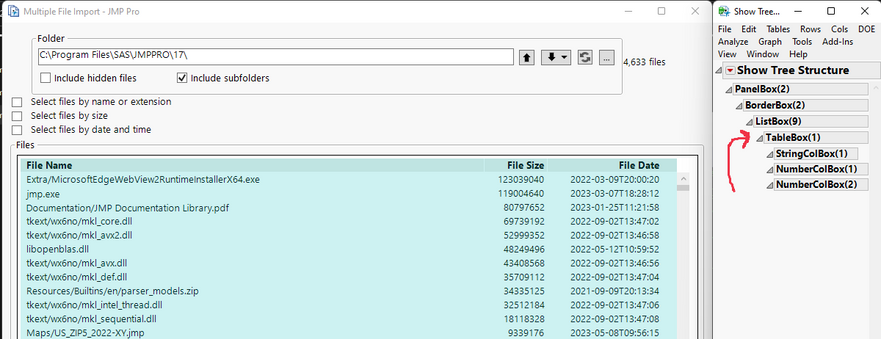
- Export the data table via scripting instead of via right-clicking in the GUI: We know that tempwin now refers to the entire Import Multiple Files window, which has the table of file sizes in it, but we don't yet know what JMP calls that table. To find out, we need to right-click on the table itself in a place where we see the Edit menu (near the edge works; in the middle of the table shows the context menu for the table instead of the Edit menu). Choose Edit...Show Tree Structure. Then, in the Tree Structure window, click on entries until the Table that we want to refer to is highlighted in the MFI window, as shown below.
This means TableBox(1) is what JMP calls this table. Now that we know that, we can tell JMP to do things with that table, like "Make into data table," and we can do that by adding the line below to our script.
dtFiles = tempwin[Table Box(1)] << Make into data table;Now, all that's left is to copy the script from Graph Builder that we already made (Red Triangle...Save Script...To Clipboard), paste it onto the end of our script, and we're done! Our entire script looks like this:
Names Default To Here( 1 );
folder = Pick Directory( "Select a directory" );

tempwin = Multiple File Import(
	<<Set Folder( folder ),
	<<Set Show Hidden( 0 ),
	<<Set Subfolders( 1 ),
	<<Set Name Filter( "*;" ),
	<<Set Name Enable( 0 ),
	<<Set Size Filter( {6, 123039040} ),
	<<Set Size Enable( 0 ),
	<<Set Date Filter( {3349776960, 3766384574.714} ),
	<<Set Date Enable( 0 ),
	<<Set Add File Name Column( 0 ),
	<<Set Add File Size Column( 0 ),
	<<Set Add File Date Column( 0 ),
	<<Set Import Mode( "CSVData" ),
	<<Set Charset( "Best Guess" ),
	<<Set Stack Mode( "Stack Similar" ),
	<<Set CSV Has Headers( 1 ),
	<<Set CSV Allow Numeric( 1 ),
	<<Set CSV First Header Line( 1 ),
	<<Set CSV Number Of Header Lines( 1 ),
	<<Set CSV First Data Line( 2 ),
	<<Set CSV EOF Comma( 1 ),
	<<Set CSV EOF Tab( 0 ),
	<<Set CSV EOF Space( 0 ),
	<<Set CSV EOF Spaces( 0 ),
	<<Set CSV EOF Other( "" ),
	<<Set CSV EOL CRLF( 1 ),
	<<Set CSV EOL CR( 1 ),
	<<Set CSV EOL LF( 1 ),
	<<Set CSV EOL Semicolon( 0 ),
	<<Set CSV EOL Other( "" ),
	<<Set CSV Quote( "\!"" ),
	<<Set CSV Escape( "" ),
	<<Set XML Method( "guess" ),
	<<Set XML Guess( "huge" ),
	<<Set XML Settings( XML Settings() ),
	<<Set JSON Method( "guess" ),
	<<Set JSON Guess( "huge" ),
	<<Set JSON Settings( JSON Settings() ),
	<<Set PDF Method( "guess" ),
	<<Set PDF Settings( PDF All Tables( Combine( All ) ) ),
	<<Set Import Callback( Empty() )
) << create window;

dtFiles = tempwin[Table Box( 1 )] << Make into data table;

Graph Builder(
	Size( 502, 413 ),
	Show Control Panel( 0 ),
	Categorical Color Theme( "Universal"(1) ),
	Variables( Y( :File Name ), Size( :File Size ) ),
	Elements( Treemap( Y, Legend( 6 ), Layout( "Squarify" ) ) )
);
3. Test and improve
At this point, the script works as intended, and we could be done. But there are some things we can do to make the script better. First, the Multiple File Import section has a lot of extra lines that we can delete. Second, it's a good practice to be sure which data table we want to use for a platform, so adding dtFiles << before Graph Builder helps ensure that we won't run into problems if we have multiple data tables open when running this script later. Once we've made these changes, the script looks much shorter and easier to grasp -- it's really just a few simple steps strung together:
Names Default To Here( 1 );

folder = Pick Directory( "Select a directory" );

tempwin = Multiple File Import(
	<<Set Folder( folder ),
	<<Set Subfolders( 1 ), //keep this for sure
	<<Set Name Filter( "*;" ),
) << create window;

dtFiles = tempwin[Table Box( 1 )] << Make into data table;

dtFiles << Graph Builder(
	Size( 502, 413 ),
	Show Control Panel( 0 ),
	Categorical Color Theme( "Universal"(1) ),
	Variables( Y( :File Name ), Size( :File Size ) ),
	Elements( Treemap( Y, Legend( 6 ), Layout( "Squarify" ) ) )
);
Conclusion
A few key takeaways are appropriate to list:
- JMP does most of the work for you when scripting.
- Getting data from windows that JMP already makes is a good way to extend JMP into tools that make life easier.
- Perhaps best of all, you don't need to stop here.
This tool could easily be modified to add a way to open selected files/folders, color by date to find large old files, organize by folder/subfolder, or any number of other modifications and improvements.
- © 2026 JMP Statistical Discovery LLC. All Rights Reserved.
- Terms of Use
- Privacy Statement
- Contact Us


You must be a registered user to add a comment. If you've already registered, sign in. Otherwise, register and sign in.