- Subscribe to RSS Feed
- Mark as New
- Mark as Read
- Bookmark
- Subscribe
- Printer Friendly Page
- Report Inappropriate Content
Statistical Thinking for Industrial Problem Solving
- JMP User Community
- :
- Learn JMP
- :
- On-Demand Courses
- :
- Statistical Thinking for Industrial Problem Solving
- :
- Conducting a Gauge R&R Analysis
Conducting a Gauge R&R Analysis
- Article History
- Subscribe to RSS Feed
- Mark as New
- Mark as Read
- Bookmark
- Subscribe
- Printer Friendly Page
- Report Inappropriate Content
Learn more in our free online course:
Statistical Thinking for Industrial Problem Solving
In this video, we use the file Micrometer.jmp to demonstrate how to conduct a Gauge R&R analysis in JMP.
In this study, the measurement system of interest is a hand micrometer, and the quality characteristic is the diameter of metal bearings. The study involves three inspectors measuring 10 parts, with each inspector measuring each part twice.
Let’s select the Measurement Systems Analysis platform from the Analyze menu under Quality and Process.
We select Diameter as Y, Response, Part as Part, Sample ID and Inspector as X, Grouping, and under MSA Method, we select Gauge R&R.
The Model type is Crossed, because every inspector measures every part. Several analysis settings are available. We select Use REML analysis as the method for estimating the variance components and click OK. If you select a different analysis setting, your results might be slightly different. For more information on the available methods for estimating variance components, search for Variance Components in the JMP Help.
Finally, we click OK to run the analysis.
The Variability chart for Diameter shows the repeated measures for each part measured by each inspector.
To conduct a Gauge R&R analysis, we select Gauge Studies from the top red triangle and then Gauge R&R.
The K, Sigma Multiplier is 6. This defines the process width as 6 standard deviations.
You can either enter spec limits or the tolerance interval, which is the width of the spec limits. We enter the tolerance interval of 3 cm.
Two tables of output are provided: Gauge R&R and Variance Components.
The Variance Components table summarizes the variances for each source of variation.
The Gauge R&R table summarizes the sources of variation relative to the tolerance interval - the width of the specs. For each source of variation, 6 times the estimate of the standard deviation is reported under the Variation (6*StdDev) column. This result is then compared to the tolerance interval.
Take, for example, repeatability. The potential width of the measurements due to repeatability variation is 1.23 cm. The spec limits are 3 cm wide. The variability due to repeatability is 1.23 divided by 3.0, or 41% of the width of the spec limits.
The total Gauge R&R variation, which includes all sources of measurement variation, is 1.34 cm wide. This is 44.53% as wide as the spec limits.
This value is also reported as the precision to tolerance (or P/T) ratio, where precision is the total Gauge R&R variation and the tolerance is the width of the specs. Our P/T ratio is 44.53.
A measurement system with a P/T ratio of less than 10% is generally considered good. A measurement system that has a P/T ratio between 10 and 30% might be considered acceptable, depending on factors such as how critical the measurement is and how much it would cost to improve the system. A measurement system with a P/T ratio greater than 30% is generally considered to be in need of improvement.
When we compare the measurement variation to our specifications, we can clearly see that our measurement system is in need of improvement.
Hi,
The analysis noted in the general JMP Gauge Studies typically is one measurement per part. How would you assess if you have multiple measurements per part? For example, measuring the average thickness of film? or taking multiple measurements for a diameter.
Will you take each measurement by itself or you take the average of those measurements for the decision? The average of the measurements is what it is used for deciding a pass/fail.
Hi,
How would you suggest to conduct Gage R&R analysis when there are many parameters and there are separate tolerance limits corresponding to each parameter. I tired to do it manually as you show in the Video but it require from me to insert the tolerance limits one by another manually which is not practical if you have hundreds of parameters.
I tired to write a JSL script but unfortunately didn't succeed to come up with a working version.
Is there a way to do the limit insertion per parameter automatically for the Gage R&R calculations? ( I use JMP 17 but not the Pro version)
Hi @julian Julian, a user @drotshil had this question for you"
How would you suggest to conduct Gage R&R analysis when there are many parameters and there are separate tolerance limits corresponding to each parameter. I tired to do it manually as you show in the Video but it require from me to insert the tolerance limits one by another manually which is not practical if you have hundreds of parameters.
I tired to write a JSL script but unfortunately didn't succeed to come up with a working version.
Is there a way to do the limit insertion per parameter automatically for the Gage R&R calculations? ( I use JMP 17 but not the Pro version)
Hi @drotshil , I believe you can accomplish this through the Manage Limits utility in JMP 17. You can find this under Analyze > Quality and Process. When you save the tolerance ranges to column properties it will use these values in your Gage R&R calculations. You can also use Edit MSA Metadata from the red triangle within the platform to change the tolerance ranges.
Hi @mia_stephens , thank you for the advice. Actually I already tried using the Manage Limits and created a table with Lower Tolerance, Upper Tolerance and Range Tolerance. When I tried to conduct the Gage R&R analysis and upload the limits it didn't work. I used the option "Load from Limits Table" (when I saved such a table with the limits before) maybe I should have use other option?
Hi @drotshil , hmmm, it should work, but it's hard to tell why it's not without seeing the data. Would you be willing to send this in to our technical support team at support@jmp.com so we can better understand the data and the root cause? Thank you!
Hi @mia_stephens , sure I can send my raw data to support@jmp.com. I wonder if we could have a short training session so you could show me how I should use the Manage Limits option? maybe I am just not doing it right.
- Mark as Read
- Mark as New
- Bookmark
- Get Direct Link
- Report Inappropriate Content
Hello @drotshil, Thank you for reaching out to us in JMP Technical Support -- we are glad that your questions have been answered to your satisfaction -- If you need anything further, please don't hesitate to reach out at support@jmp.com or call us at 800.450.0135 (US) from 9am-5pm EST M-F. Cheers, @PatrickGiuliano
P.S. I am including a summary of the instructions we provided in a follow-up Comment for the benefit of other users here on the Community (courtesy of my colleague @sseligman).
- Mark as Read
- Mark as New
- Bookmark
- Get Direct Link
- Report Inappropriate Content
(How to efficiently conduct a Gauge R&R analysis on Dozens outputs (each with tolerance limits))
In JMP it’s typically quite easy to perform a Gauge R&R on a single output -- we enter tolerance limit(s) (or a tolerance range) when prompted by the Gauge R&R Specifications Dialog within the Variability Charting Platform (under Analyze > Quality and Process), and then JMP produces the result.
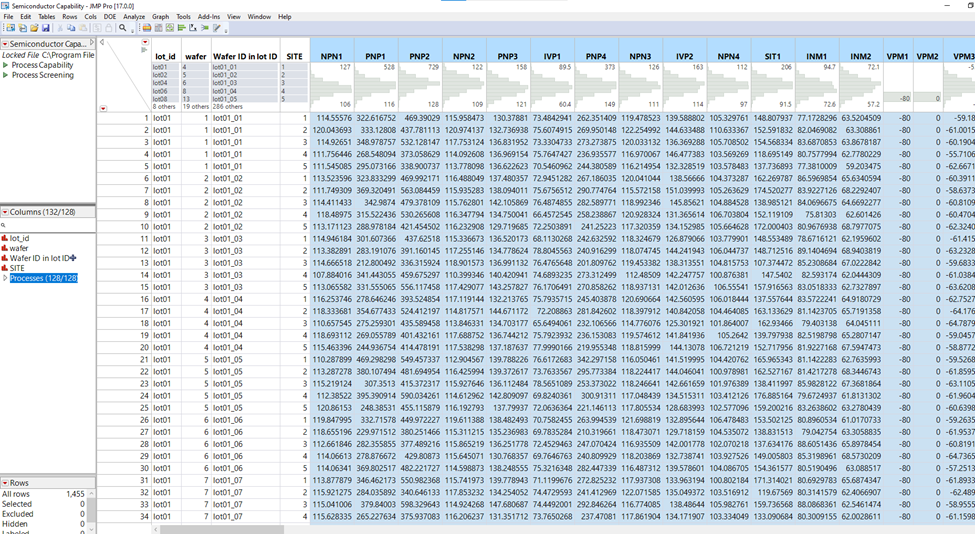
What if we wanted to use JMP to perform a Gauge R&R analysis efficiently in with dozens, hundreds or even thousands of outputs (each containing tolerance limits)? Entering these limits manually would be incredibly inefficient. Perhaps the easiest (and certainly the most interactive) way is to utilize the Manage Limits Utility. For the sake of example, consider the Semiconductor Capability sample dataset (128 outputs), available in the JMP Sample Data folder.
Note that your raw data must be in this Wide format (with one output per column) rather than a Tall format. If not, you can use Tables > Split to restructure your data.
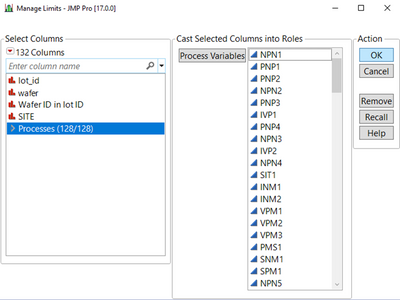
From the data table, go to Analyze > Quality and Process > Manage Limits. Enter all the Process variables and click OK.
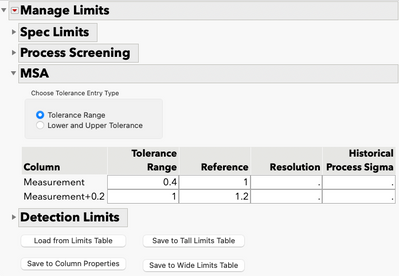
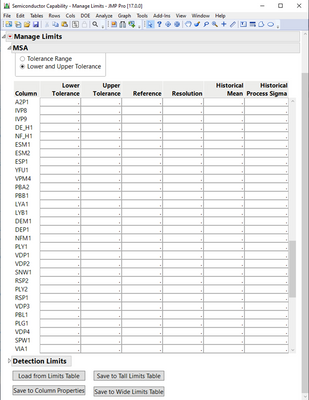
Expand the MSA section and you can enter the tolerance limits:
If you already have a table containing all the limits for the process variables, you can use the Load from Limits Table at the bottom of the window. The table must be in one of two specific formats to read the limits. This page explains what those formats are.
After populating the Manage Limits dialog, click on the Save to Column Properties button. The appropriate limits will be associated in the data table with each column. Then, when running the Gauge R&R, limits will be automatically entered.
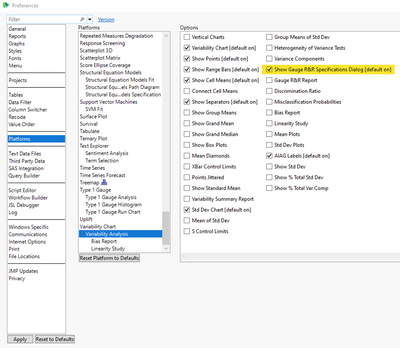
Suppose you had more than 1000 parameters. Even though the limits are automatically inserted when running the Gauge R&R, by default, JMP will still prompt you with specifications dialog for each parameter. This would require you to press “OK: more than 1000 times before JMP generates the analysis for each of the > 1000 process variables. To bypass this, there is a Preference you can deselect which will prevent the specifications dialog from appearing when you select the Gauge R&R analysis.
Go to File > Preferences and select the Platforms preference group. Then select Variability Analysis. Look for the preference "Show Gauge R&R Specifications Dialog [default on]." Uncheck the box next to it, and click OK to close the window. Now, with this preference unchecked, JMP will use the spec limits defined in the data table without showing the specifications entry dialog.
Hope this helps!
- © 2026 JMP Statistical Discovery LLC. All Rights Reserved.
- Terms of Use
- Privacy Statement
- Contact Us
