Administrating Groups
Administrating groups in JMP Live presents a different challenge, as groups have their own subsets of users and administrators. A system admin is a group admin, but a group admin does not necessarily have to be a system admin. As a system admin, you are not immediately added to every group contained within the server. However, you can still view and administrate a group you are not a part of.
 A view of the available options in the Posts tab, showing all published reports when a group is opened in JMP Live.
The following steps show how to view a group that you are not a part of, as well as how to access all the group’s settings:
- Go the Groups section under the Admin tab to see all the created groups within the server.
- Select the desired group by clicking on Group Name.
- View the Manage Group tab. As an admin, you can:
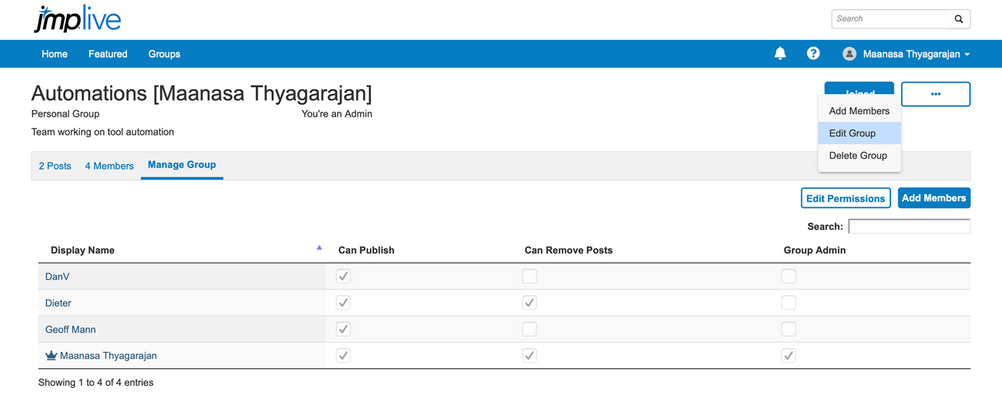
- Edit Permissions to change a user’s ability to publish and remove posts, as well as change a user’s status as an admin.
- Add Members to add new members to the group.
- Select the Posts tab. This shows all of the reports published to this group. As an admin, you can view and administrate the reports (see Administrating User Reports section).
- Select the Join button in the top right to join the group.
- Select the … button in the top right to perform the following actions:
- Add Members.
- Edit Groups to make changes to three possible settings:
- Change the Group Name.
- Change the Description of the Group.
- Change the Group Type, choosing among four different types of groups; each group is defined in a box to the right in the Edit Group window.
- Delete Group.
 A display of the Manage Group tab for a group, with various permissions available that can be edited for each user. The group admin is indicated by the Crown symbol.
A group admin can access the same settings using the same steps as above, but replacing Steps 1 and 2 with the following:
- Go to the Groups tab to see all the groups that you are a part of, including groups for which you are not an admin.
- To see if you are an admin of a group, click on Group Name. If you are not its admin then you will not be able to change any settings for that group.
There are three ways to assign a group admin:
- A system admin changes a user’s permissions within a group to make that user a group admin.
- A group admin changes a user’s permissions within a group to make that user a group admin.
- The group owner (user who created the group) can set his/her permissions to be a group admin.
Trick #4: Editing user permissions using JSL code
A system/group admin can also script administrative actions using JMP Live’s REST API in conjunction with JMP Live’s HTTP Request() function.
The attached script (JMP Live Login.jsl) is used to log in the admin. This process requires four pieces of information:
- JMP Live URL - line 8
- API Key - line 9
- Username - line 10
- Password - line 11
Once logged in, the code below provides examples of administrative actions that can be scripted:
// --------------------------------------------------
// Get a list of all the groups and generate a table with all the groups
// --------------------------------------------------
request << reset( Url( webJMPUrl || "/api/groups/?all_groups=true" ), Method( "GET" ), Insecure );

data = request << Send;
dt2 = JSON To Data Table( data );

// --------------------------------------------------
// Add a member to a group with the following permissions:
// “allow_publish” – can this user publish to this group?
// “allow_delete” – can user delete content published by other members?
// “allow_admin” – can user add, delete and change permissions of group members?
// --------------------------------------------------
request << reset(
	Url( webJMPUrl || "/api/groups/" || Char( Group ID number ) || "/members" ),
	Method( "POST" ),
	Form( Fields( ["uid" => user’s id number, "allow_publish" => 1, "allow_delete" => 1, "allow_admin" => 1] ) ),
	Insecure
);
data = request << Send;

// --------------------------------------------------
// Change permissions
// --------------------------------------------------
request << reset(
	Url( webJMPUrl || "/api/groups/" || Char( Group ID Number ) || "/members/" || Char( User ID Number ) ),
	Method( "PATCH" ),
	Form( Fields( ["allow_publish" => 1, "allow_delete" => 0, "allow_admin" => 0] ) ),
	Insecure
);
data = request << Send;

// --------------------------------------------------
// Delete a member from a group
// --------------------------------------------------
request << reset(
	Url( webJMPUrl || "/api/groups/" || Char( Group ID Number ) || "/members/" || Char( User ID Number ) ),
	Method( "Delete" ), Insecure
);
data = request << Send;
Editor's note: Have you read the other installments in our JMP Live admin tricks series?
You must be a registered user to add a comment. If you've already registered, sign in. Otherwise, register and sign in.