In last week’s blog post, we created an Experimental Design File (EDF) using JMP Genomics for a set of gene expression files corresponding to 18 different experimental groups. Now that the experimental design is organized into a SAS data set, the data files (in txt format) can be imported and concatenated into a single table using the Import a Designed Experiment from Text, CSV, or Excel Files tool that will be ready for analysis in JMP.
Importing/Combining Multiple Files
- To begin, make sure each of the txt files from E2_Expression_Data.zip are downloaded and stored in a single folder.
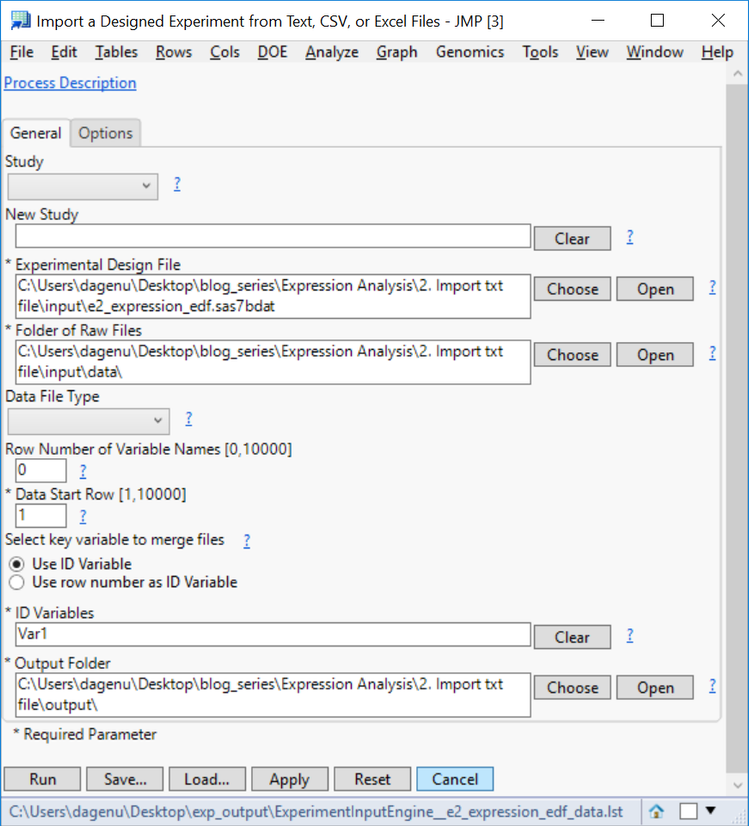
- From the Genomics Starter menu select Import > Text > Import a Designed Experiment from Text, CSV, or Excel Files.
- On the General tab, designate the file e2_expression_edf.sas7bdat (created in the Expression Analysis with JMP Genomics, Part 1: Experimental Design blog post) as the Experimental Design File.
- Designate the folder in which the 18 txt files from zip are stored as the Folder of Raw Files.
- Leave the Data File Type option blank. If the values are separated by a specific delimiter (comma, space, tab), that can be specified here.
- Since there are no variable names in these files, set the Row Number of Variable Names to 0. Set the Data Start Row as 1.
- ID variables are present in the first columns of these files, and can be used to merge each of the data files. Select Use ID Variable as the key variable to merge files.
- Since the files do not have column names, the columns are designated to the default of “Var1”, “Var2” etc. Set Var1 as the ID Variable.
- Designate an Output Folder.

- Click Run to begin the import.
Results
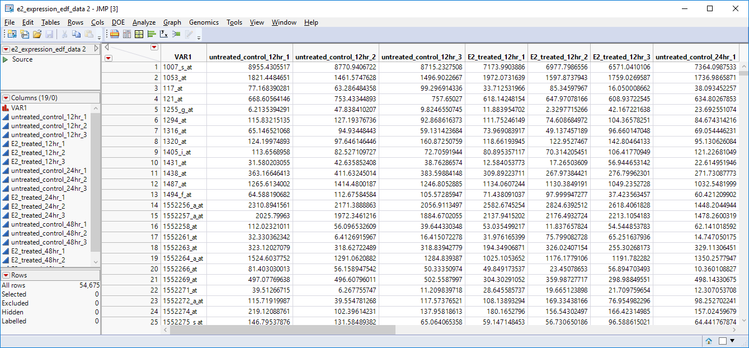
- When the import is finished, a window will appear with both the EDF and the data file in .sas7bdat. The top file is the EDF, which is identical to the input EDF. The bottom file is the new data set. Open the Intensity data set to view the file of expression values for each experimental group.

- The column VAR1 now contains the marker names from the text files. Each of the other 18 columns correspond to each of the experimental groups that were designated in the ColumnName column in the EDF.
Summary
This post outlined the steps necessary to import and combine multiple data files from a single folder using the Import a Designed Experiment from Text, CSV, or Excel Files tool. This tool is useful for importing multiple files from a designed experiment. Before beginning the process, an Experimental Design File must be created, and all data files must be stored in a single folder. The output from this analysis is in .sas7bdat format and is now ready for expression analysis using an expression workflow. Next week’s post will do an expression analysis on this data set using the Basic Expression Workflow.
You must be a registered user to add a comment. If you've already registered, sign in. Otherwise, register and sign in.