Isn't Define Factor Constraints something I should just leave alone or pretend doesn't exist?
A wise man does nothing by constraint. -Marcus Tullius Cicero
If you've felt intimidated by the Define Factor Constraints section in the Custom Designer, you're in good company. Apparently, even Cicero may have found the Define Factor Constraints section of JMP's Custom Designer daunting.

Choosing anything in that section other than "none" can be a little nerve-wracking for those who don't yet know how easy it can be to use. It turns out JMP already has the tools you need to make this an easy experience.
Wait. I'm not even sure I know what you mean by "factor constraints." What are they? What are they used for?
In many experiments, the low and high levels of factors combine in ways that are either impossible, would destroy equipment, or become extremely expensive. For example, think of a company running an experiment to maximize production output for a specific process. The company can use two machines: Machine A has a speed dial from 1-5, but Machine B is newer, and its dial is 1-6. This would be a good time to know how to use factor constraints when designing an experiment.
Ok, I'm curious. Can you walk me through the first option (Specify Linear Constraints)?
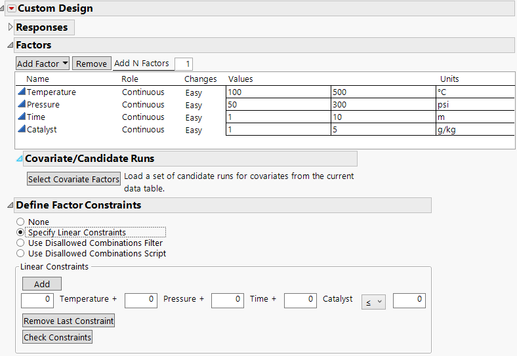
In the experiment pictured below, imagine you're an experimenter trying to maximize the yield of a reaction in an oven process that includes Temperature and Pressure. One problem is the oven can't run at both high temperature and high pressure—the oven will break. So you need a way to limit the design space of the DOE so that no runs are created that will break the oven. This is a great opportunity for the Specify Linear Constraints option.

To populate the Linear Constraints section, it's helpful to step outside of the Custom Designer and visualize the design space. Using Graph Builder and talking with some process experts, you can develop the graph below, where any DOE run that occurs within the blue shaded area is guaranteed not to break the oven. The process experts (and Maintenance) are glad you've promised not to experiment in the blank region at the upper-right corner of the graph.

Now, all you have to do is find a way to turn the graph into a way to populate the Linear Constraints section of the Custom Designer. It turns out that the Graph Builder can already do this. All you have to do is Hide/Exclude all the rows except for the two rows that make up the sloped line for the limit, then ask the Graph Builder for the equation that fits the line for the remaining points.

This graph tells you that the oven can run just fine as long as the Y (Temperature) is lower than the line. A tiny bit of algebra and substitution is required: Add 2x to each side of the equation, then substitute Temperature for Y and Pressure for X, and you have what you need to fill in the Linear Constraints section in the Custom Designer.


After making the DOE table, you can check using the Graph Builder and see that the DOE is avoiding the troublesome area of high temperature and high pressure in the oven.

That seems straightforward. What about the example earlier with machines that had different constraints? How should that be handled?
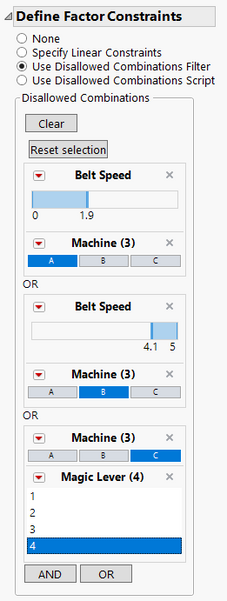
Machines with different constraints are best handled with the second option, the Disallowed Combinations Filter. Use this filter to specify which combinations of factors to exclude (i.e., to disallow) in the experiment. Consider the following list of problems with three machines you want to include in an experiment to maximize productivity. Each machine was designed with a belt speed setting that ranges from 1-5 and a Magic Lever that has four positions, marked 1-4 (no one knows what it does; you're including it as a factor because you're convinced it does nothing and you want to remove it from all the machines):
- Machine A can't go below belt speed of 2 or the motor overheats
- Machine B can't go above belt speed of 4 or it trips a breaker
- Machine C has a Magic Lever that can't be pushed into position 4 unless there's a really strong person running it.
Using the interface to make the Disallowed Combinations Filter look like the example below tells JMP not to choose any runs that would fit any of the constraints listed above.

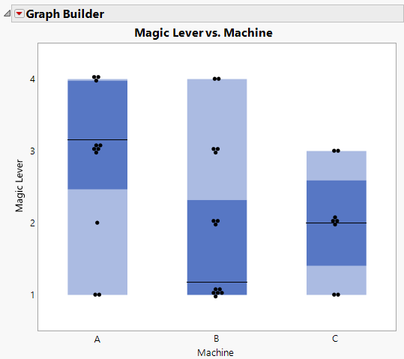
After you make the DOE table, use the Graph Builder to verify that the constraints were handled correctly.


Ok, the first two options seem pretty easy now. Surely the third option is the one everyone is scared about, right?
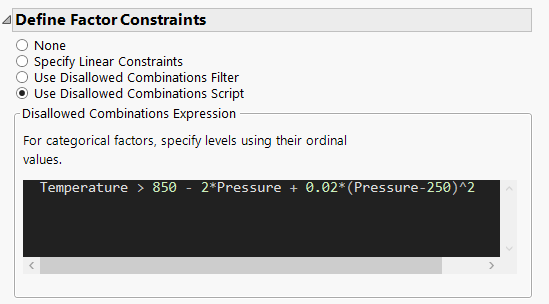
Actually, the Disallowed Combinations Script is often the easiest way to constrain factors in a DOE because JMP already does the work; you only need to copy/paste into the script box. Think back to the first example, where there was a straight line at the edge of the allowable Temperature/Pressure design space. What if, instead of a straight line, you needed a curved line? That's not something that could be entered in either the Linear Constraints section or the Disallowed Combinations section. It's easy to enter into the Disallowed Combinations Script session, though. The key, in this case, is to use the Fit Y by X platform to fit a line (Polynomial, 2nd order) to the curved border of the allowable design space, then copy the formula that JMP has already created (note that in the graph below, points in the other corners were Excluded but not Hidden, and the extra lines were drawn using the Line tool from the Tools menu).

Copying the formula for the line from the Fit Y by X platform to the Disallowed Combinations Script section in the Custom Designer gets you 99% of the way there--all you need to do is change the '=' in the formula to '>', because any Temperature greater than this curve should be disallowed.

After building the DOE table, you can verify that the line that separates acceptable vs unacceptable runs is now curved.

This seems easier now. I guess I was scared of nothing, right?
Well, I like to think that if Cicero knew how easy DOE constraints were in JMP (and had lived long enough to use JMP), his quote would have been:
A wise experimenter fears no factor constraint. -Enlightened Cicero
I've attached a JMP Journal to this blog post to allow you to follow along and recreate everything covered above. As a challenge, consider how you would create a constraint with three (or more) factors instead of just two (hint: think about how the Fit Model platform can show a formula).