- Subscribe to RSS Feed
- Mark Topic as New
- Mark Topic as Read
- Float this Topic for Current User
- Bookmark
- Subscribe
- Mute
- Printer Friendly Page
Wasatch Front JMP Users Group Discussions
Open to all JMP users in Salt Lake City, UT area- JMP User Community
- :
- JMP Users Groups
- :
- JMP Users Groups in North America
- :
- Wasatch Front JMP Users Group
- :
- Discussions
- :
- Summary Table, Ninja Style
- Mark as New
- Bookmark
- Subscribe
- Mute
- Subscribe to RSS Feed
- Get Direct Link
- Report Inappropriate Content
Summary Table, Ninja Style
One of the things that I often mention to newcomers to JMP is that the "Power of JMP" is in the data tables - they usually look at me a bit askance, squirm a bit and try to change the subject to the hot new freshness, and generally respond with "Sure don, but I don't care about lowly tables, I want to know about Deep, Deep Neural Networks!" - all in good time my young Padawan. To back-up my claim, all we have to do is look to where the JMP developers have placed the Tables menu item -right after File, and before DOE. It is clear the level of importance they themselves give to tables - right up there with breathing! There are currently twelve options under the table menu and to achieve the John Sall ninja level you must understand them all. Fortunately, JMP has excellent training material to help you with that, and I will leave that for study during your meditations. For this post, I'm going to show a simple script to obtain a lowly summary table.
Personally, I use summary tables all the time. I use them to check the values in a column, I use them to select rows in the main table via the table linkage property, I use them for reports to management - and when necessary, I cut my hair with them - basically the better question would be, "when do I not use summary tables…" and of course the answer is when the data requires a slightly subtle transpose or stacking or joining or concatenating as the ninja level (and data) dictate.
Why you may ask would we need a script to create a summary table when the very first menu item under the Tables menu is Summary?

Firstly, to achieve the John Sall ninja level you will control JMP with your mind - however before we can hope to achieve that level of skill, we must walk. And we must walk before we can run, and scripting is the way for us to skip at a slightly faster than walking pace - which is a nice trade-off until our force (JMP) skills develop. Secondly, would be to understand that summary tables and aggregations are the beginning of the canonical Split Apply Combine method outlined by Hadley Wickam - (which is far on the journey up the mountain to the John Sall ninja level). And lastly, because by applying this method I have saved myself a ton of summary button mouse clicks and have now accrued enough time to write this blog post.
And without further annoyance, here is the given summary table JSL script. Note, it is given in a handy and ninja friendly functional format as all good scripts are. This will make it quite easy for you to bend it to your will and make modifications for it to give up all the ninja table secrets.
//begin script
//DEFINITIONS
Names Default to Here(1); //Always begin scripts with this!
//function will create a summary table of counts from the current data table
//requires a column to be selected in the table
sumdt = Function({dt}, {Default Local},
selcollst = dt << Get Selected Columns(string);
//Grab select columns
If(NItems(selcollst) > 0, //check that a column is selected in the table
summaryexpr = Expr("dt << Summary(Group(sublst))"); //base expression for a summary table
liststr = ""; //empty string place holder
//build Expr
for(idx=1, idx<=NItems(selcollst), idx++,
If(idx == 1,
liststr = "Column(\!"" || selcollst[idx] || "\!")"; //for first column
,
liststr = liststr || ", Column(\!"" || selcollst[idx] || "\!")"; //if there are additional columns
);
);
SubstituteInto(summaryexpr, "sublst", liststr); //perform the substitution
sumdt = Eval(Parse(summaryexpr)); //here is where the magic happens
return(sumdt); //always nice to return a handle - maybe you will use it in another script?
, //then nothing is selected in the data table - it's nice to prompt the user if they haven't selected anything
Caption(
{200, 200},
"Please select a column to aggregate",
Font("Arial Black"),
Font Size(16),
TextColor("red"),
BackColor("black"),
Spoken(0)
);
Wait(4);
Caption(Remove);
);
);
//MAIN
dt = current data table();
sdt = sumdt(dt);
//end of script - formatting in this blog is not good for JSL...
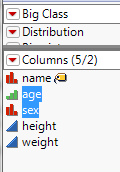
While this is nice and you can easily verify it for yourself, I feel if we do not incorporate this into our workflow we are somehow not really trying to get to that ninja level. Also, a moment discussion on workflow would be appropriate. I have this simple script linked to a keyboard hot-key combination and my workflow consists of: while I have a data table open I select a column from the column panel <below> and then use my hot-key combo to get an aggregate (summary table) of the selected columns. That really is all there is to it. Ninja skills are apparently deceptively simple.
Column viewer (Big Class) - select aggregate columns of interest
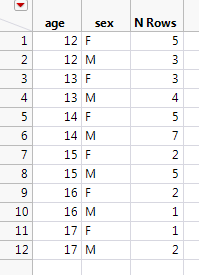
Hit the hot-key combo for our table summary script to get the aggregate by (age, sex)
Wait, hot-key you say... So how do we link the script to a hot-key? Good question - I'm sure there is a better ninja (JMP) reference on this but briefly…
1. copy the script to your clipboard
2. Under View --> Customize --> (select) Menus and Toolbars

3. Under the toolbars section right click to add a New Toolbar
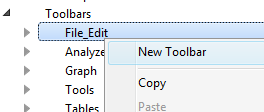
4. Name said toolbar - of course Ninja would be appropriate

5. Expand ninja and select the untitled script

6. On the right hand pane name your script and paste our JSL function into the 'Run this JSL' section
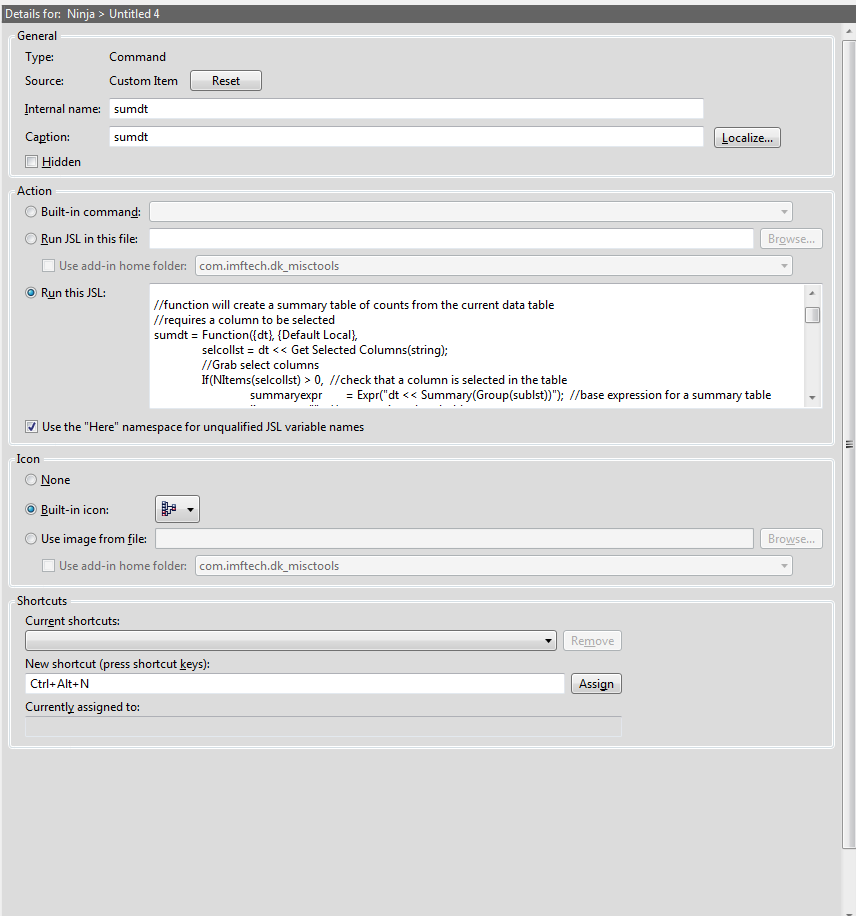
7. Choose a nice built-in JMP Icon - hey thanks JMP I'll just borrow that summary table Icon
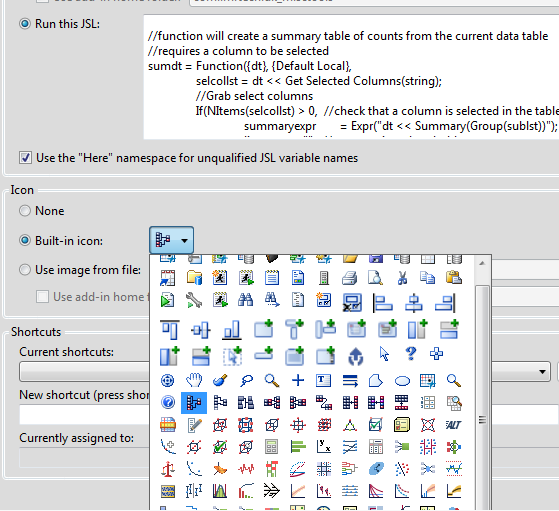
8. Make sure to assign your shortcut! You will get an extra ninja level for that!

Hit OK and level up!
You may get this customization screen - just hit Ok
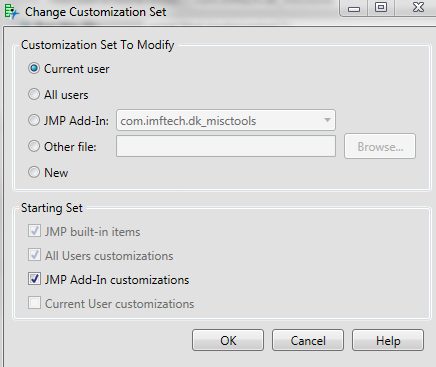
If you are one of those visual folks and want to see your new button - just head to View --> Toolbars and make sure your new Ninja toolbar is checked
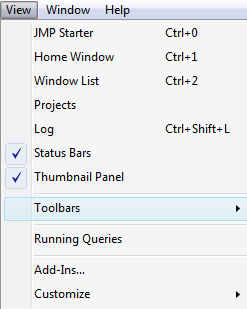

Enjoy your new Nina Table Skills!
Best,
don
- © 2026 JMP Statistical Discovery LLC. All Rights Reserved.
- Terms of Use
- Privacy Statement
- Contact Us
