- JMP User Community
- :
- Blogs
- :
- JMPer Cable
- :
- The 5th thing I wish I knew when I started scripting: How to string things toget...
- Subscribe to RSS Feed
- Mark as New
- Mark as Read
- Bookmark
- Subscribe
- Printer Friendly Page
- Report Inappropriate Content

- The 1st thing I wish I knew when I started scripting: There are different kinds of scripts
- The 2nd thing I wish I knew when I started scripting: Getting help
- The 3rd thing I wish I knew when I started scripting: The Answer Button is your friend
- The 4th thing I wish I knew when I started scripting: What to do when things go wrong
All right? Still here? Did you look at the earlier episodes? Excellent! Onward to glory!
From the homework a couple of weeks ago, we should all have a bunch of JSL snippets from using Save Script to Script Window or the Scripting Index to get pieces of code that we need. You did do your homework, right? Good! Let’s get into stringing everything together into an actual script. But first, we gotta have a little chat.
One of Mikey's coding pet peeves
Okey-dokey, folks. Let me, just for a moment, get up on my soapbox about something. When we write code, we must always comment it! We can’t make any assumptions about the person who will read our code after us, including ourselves.
Back in college, I took a Visual Basic coding class. The first thing we learned was how to comment code and write pseudocode. Pseudocode, by the way, are comments that you write before writing code to help you map out what you need to do (they are similar to the punch list I had you write in that first post). The instructor called commenting and pseudocode “being a good citizen in the coding community.” We were even graded on how well we commented the code we submitted. It’s that important.
The truth of the matter is that you rarely have complete control over who sees your code. Case in point: In this blog series, I have given you step-by-step instructions on how to reverse-engineer someone else’s add-in. I can guarantee that some (if not most) of the people who wrote those add-ins were not expecting others to peek under the hood at their code. I can also guarantee that you’re not going to find as much commenting in the code to help you figure out what’s going on as you’d hope.
You need to comment your code to make sure that someone who views it later can understand what you’re doing easily. Yes, commenting is a pain. And, yes, it takes extra time. But, no, you can’t just skip over doing it. It will pay dividends in the long run. And I do practice what I preach here. I’ve got add-ins that I wrote five years ago that I can still understand because I did detailed commenting (and I still remember how tedious it was to do!).
So, those of you who already code, make sure you’re commenting your code so that someone else can understand what you’re doing. Those of you who are learning, get into the habit and stay in the habit of heavily commenting your code. Now, let me get down from this soapbox and show you how.
Commenting in JSL
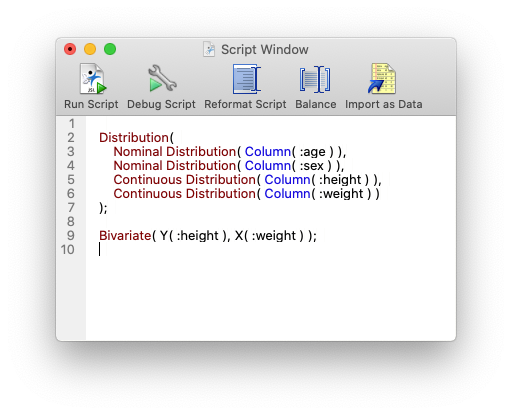
Let’s open up JMP and open that Big Class Families.jmp data table we’ve been using. If you didn’t save the script example from the last session, go ahead and recreate it. You should have something that looks like this:
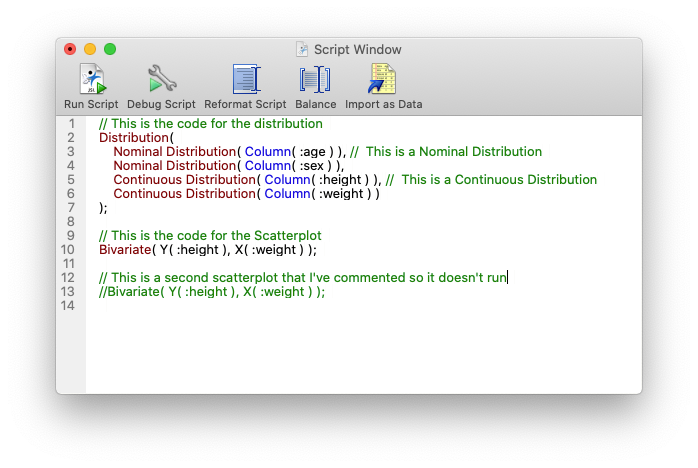
There are two ways to put comments into your JSL code. The first is to comment out individual lines using a double forward slash ("//"). Anything after the slashes until a carriage return (hitting return on the keyboard) will be ignored. I generally use this method to do my short inline commenting. It’s also useful to turn off single lines of code that you don’t want to run. Let’s have a look at what that means:
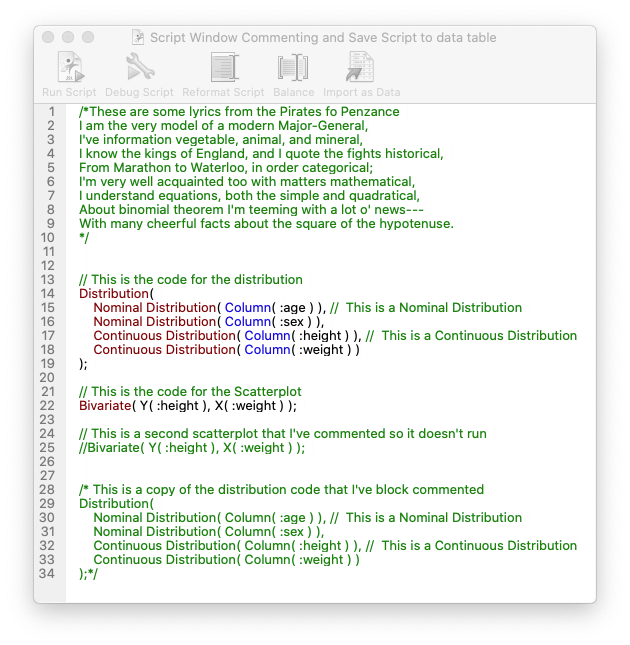
The second way you can comment is used in cases where you want to turn off large blocks of code or to generate large blocks of comments and text. This type of comment is called a comment block. It’s done using an opening comment flag made of a forward slash and an asterisk ("/*") and a closing comment flag made of an asterisk and a forward slash ("*/"). Here’s an example of how this might be used:
Note that I’m not discussing commenting style here. That’s actually up to you. You’ll develop your own style as you go along and may even have different commenting styles for different purposes. My inline comments (like the ones in the examples) are completely different from the commenting I do in something like an application. The point is to write the comments and to be internally consistent in a script with how you do it.
The hardest bits in this entire series
Really, this entire series has been leading up to these next items. There are three core things you need to know to get started in JSL. The first is commenting (see the sermon earlier in this article). The second and third are how to name things and how to send messages to them.
I suppose it’s possible to code up your own ANOVA algorithm (a colleague of mine tells a very entertaining story about that). But, it’s a lot easier to tell a data table to run an ANOVA using Fit Y by X through a message, like we learned in the previous episode. That basic workflow (name something, send a message to it) is a lot of what JSL is about. Yes, you can get into logic and loops, GUI development, etc., but brute force scripting really only requires names, messages, and a little searching the Scripting Index.
Naming things
Let’s start with naming things. You name things by giving JMP a name following it with an equal sign and then writing the text, number, code, etc., you want that name to represent. The name is called a variable. You can think of variables as containers that you can put stuff into or as nicknames for open reports in JMP.
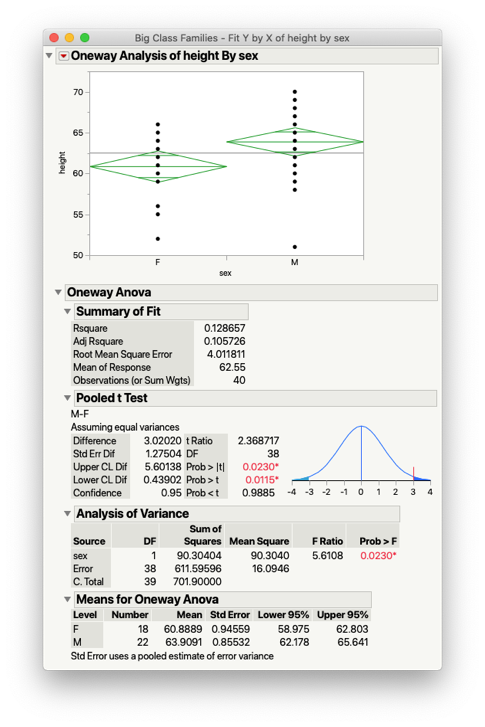
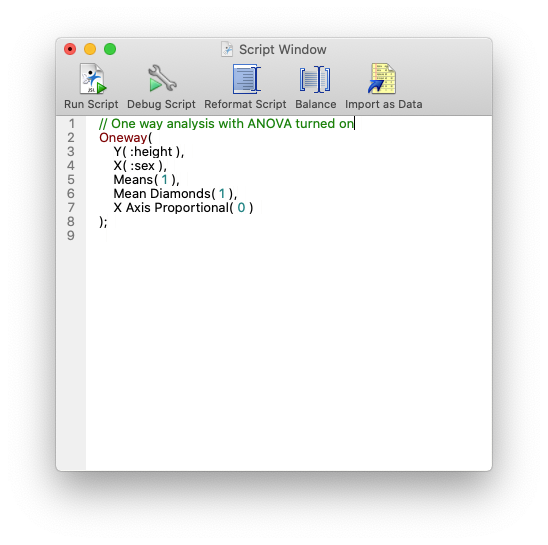
Let’s look at an example using an ANOVA. To create the code for an ANOVA, first run the analysis in Fit Y by X (under Analyze), then turn on the ANOVA test, and then save the code out to a script window. Here’s the report for that using Big Class Families.jmp and the resultant JSL code saved from the red triangle menu (height as Y, sex as X, and selecting Means/Anova/Pooled t under the red triangle) :
This little JSL snippet will produce an ANOVA for any data table that has the same column names as the original data table. (We’re not going to worry about parameterization in this series, though. It’s a bit out of scope.)
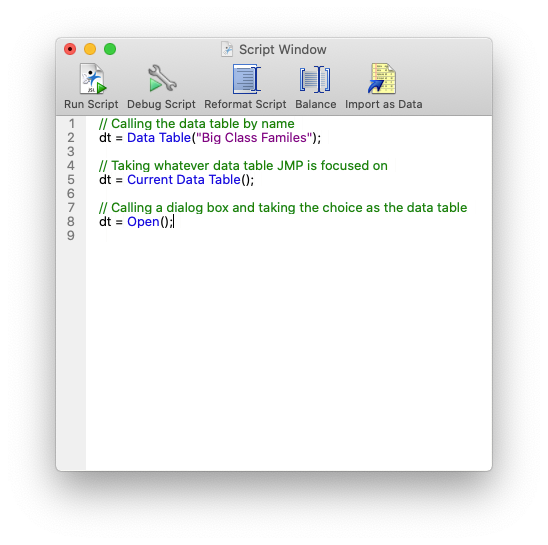
Now, what if you’ve got a bunch of data tables open and you want to control which data table you want to run that ANOVA on? Well, you can edit the script by giving a name to the data table you want to run the ANOVA on and then sending the JMP-generated code as a message. If you were to look in the Scripting Index (see the article on getting help), you would find a couple of ways to do this. You could either call a data table directly or grab a reference to the data table JMP is currently focused on by using Current Data Table(). There is a third option that’s a little more advanced, where you give a data table a name as you open it. I’ve put examples of all three below (and again note the use of comments to convey information!):
Calling the data table by name will work as long as there is a data table open that has the name you are trying to use. This can be handy if you have a list of data table names to work from. It can also be handy if you’ve hidden or minimized your data table. In either case, you can still send messages to the data table even if you can’t necessarily see it. This method uses the form:
<variable name> = Data Table(“<data table name>”);
Probably the most useful way to assign a variable to a data table for our purposes is to use the Current Data Table () function. This function grabs whatever is the active or current data table and assigns it to the variable that you’ve indicated. Once the table is assigned to the variable, it doesn’t matter if another data table becomes “current” (e.g., by creating a summary table, you’ll always have a reference to the first data table until you redefine the variable). It has a simpler form:
<variable name> = Current Data Table();
The last method is useful if you want to assume that the data table may not be open when someone runs the script. By using this method, JMP will generate a file dialog that allows the user to select the file they want to open. When the user confirms their choice, the file will be opened and assigned the variable name you’ve given it. Again, it’s a simple form:
<variable name> = Open();
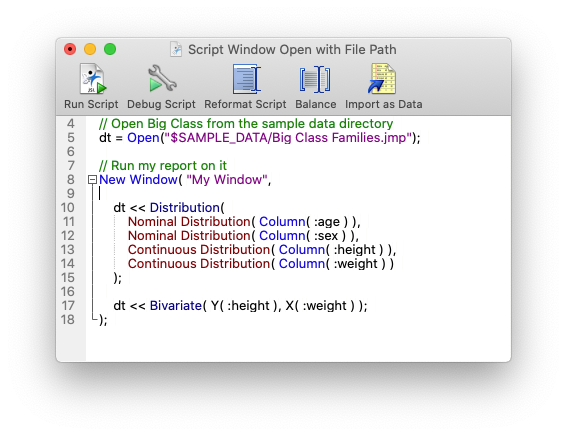
Using the Open(…); method can also be handy if you’re comfortable working file paths and directories. You can put the file path inside the parentheses to tell JMP where to look for the file, like this:
Also, note that I’m using something called a Path Variable in the Open(…); command to shorten the string. There’s a section on them in the Scripting Guide.
Sending messages
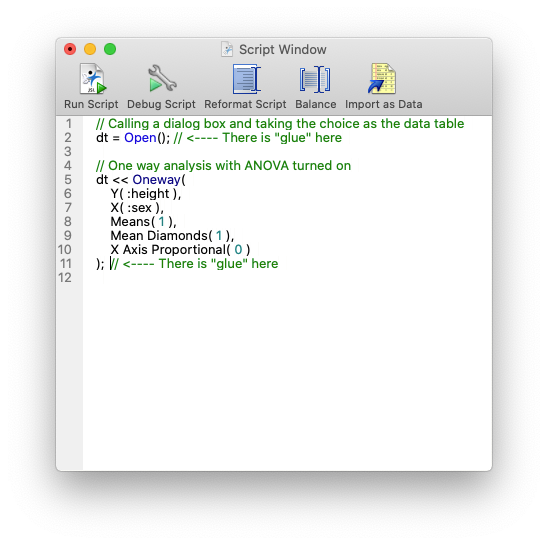
Now, once you’ve named something, it’s possible to send it a message. It works similarly to sending a text message to someone on your phone. When you send a text, the first thing you need to know is their name, email address or phone number of the recipient, something to identify them. You enter that into the messaging app and then you send the message. Here’s how to do it using the Big Class ANOVA. I’m going to have some fun and have JMP ask me to open a file in this case:
Let’s unpack what we’re seeing here starting at line 5. The first thing that we see is the variable name of the data table we want to give an instruction. Just like when we send a text or give an instruction to a person, we have to identify who we are talking to. Next there are two “less than” symbols (<<). We’ve already seen something like this with the Glue Operator (;). The “<<” symbol is referred to as the Message Operator. It lets the message recipient know that what follows is a message. After that, we see a function called Oneway(…); with the arguments that the function needs to create the ANOVA report. Note: you can get all the information on the options for that function in the documentation or Scripting Index, but you don’t actually have to write any of it out longhand. Simply run the analysis through once and grab the finished script (with all the options) using one of the Save Script to... commands I showed you earlier.
Some odds and ends
Okay, there are three last details that need to be addressed. The first is the issue of stringing things together. For instance, if you wanted to do an ANOVA and create a Graph Builder in the same script, you’d need to warn JMP that further instructions are to follow. To do this, use that Glue Operator (;) that I keep mentioning.
Like a semicolon in written English, the semicolon at the end of a command lets JMP know that there are more instructions to come. Glue is found at the end of an instruction like Bivariate(...);, or Distribution(...); , or giving something a name: stuff = 5 + 6;. As you may recall from earlier posts, JMP includes the semicolon automatically when we use Save Script…To Script Window, but when scripting freehand, this happens to be the most common error I commit during scripting – forgetting to glue things together.
The second detail is ensuring your scripts are good citizens in a JMP session. This is done by assigning all the variables you create to a namespace. A namespace is a little sandbox that keeps the variable names that you create from interfering with other parts of the software. The default namespace is called the “Here” namespace. In scripts it looks like this (see line 2):
This instruction should always go at the beginning of a script (until you learn when not to use it!) to keep your variable names from colliding with other scripts or parts of JMP. Before you start pulling out your hair on this point, here's a TL;DR version of what I just said: Just remember to always put "Names Default To Here(1);" at the beginning of your script and you'll be fine for the moment. If you want to learn more about Namespaces, there's a paragraph on the topic in this other post I wrote a while back.
The last detail I need to discuss is how to change a column name in a saved script. It’s really simple. Look in your saved script. You should see your column names with a colon (“:”) in front of them. That colon indicates that they are column names (it can mean other things, but for now, it means column names). To change a column name, just change it, but remember to put the colon in front. If your column names contain special characters, you might run into something like :Name(“…”) when JMP outputs the script for you. That’s how JMP handles the fact that your column name has characters that would cause problems if it wasn’t clear that they were part of a string. Even though it’s bad coding form to use :Name(“…”) in our scripts, the software gets to use it because it doesn’t have a choice. You should try to choose better column names.
But you forgot about...
OK, I realize some of you are probably getting a little twitchy at this point. You may be thinking, “YOU FORGOT ABOUT FUNCTIONS!!!” or “BUT WHAT ABOUT EXPRESSIONS!!!” or even, “YOU TWIT!!! YOU COMPLETELY GLOSSED OVER LOGIC AND LOOPING!” First off, it’s not nice to call names. Second, I didn’t forget about any of that. I consciously omitted it.
The thing is, this series is not meant to blow your hair back. Like I said toward the beginning of the series, it’s meant to point your nose down the right path, give you a good map, some snacks, a pat on the back, and show you where to look for help in case you get stuck. It’s a starting point. (You have my permission to get a snack at this point, btw.)
For those of us who script regularly, a lot of what I’m talking about here is so foundational – so basic – that it’s muscle memory. The thing we’ve forgotten is that, just by using the foundational knowledge I’m covering here, a neophyte scripter can cover a lot of ground. Anyway, if you’re hyperventilating because I didn’t cover anything super fancy, relax. We’re going to go way down the rabbit hole in the next series. For now, let’s get back to the discussion and talk about this week’s homework.
Homework
All right – here we are. The big homework exercise. This week, you’re going to take the bits of code that you made last week and glue them together. Do this one bit at a time. If your script is going to live outside a data table (as a JSL file), then start with opening your data table and putting it in a variable. After that, regardless of where your script is going to live, add a bit and check that it does what you expect. Then add more and check again that you get the expected result. Remember the Community, help files, etc., are your friends. If you get error messages, look at the log (View > Log for PC and Window > Log for MacOS) and the previous episode.
Good luck and see you next week!
- © 2024 JMP Statistical Discovery LLC. All Rights Reserved.
- Terms of Use
- Privacy Statement
- About JMP
- JMP Software
- JMP User Community
- Contact



You must be a registered user to add a comment. If you've already registered, sign in. Otherwise, register and sign in.